Floty
Z Tauripedia
Fleets are used to group units. Each unit is of one of two types (land, air).
NOTE: Fleets can move only when they contain some air units. In order to bring land units to your fleet, make sure you have some transport ships like Transporte Pequeño in your fleet.

To get to the fleets management screen, click the ship icon from the main side menu.
The Fleets management screen is divided into two sections: upper and lower.
Upper section is used to create and edit fleets. The lower section manages sending fleets on missions. In the upper section, you can do the following: create fleet, edit fleet, name fleet, divide fleet and disband fleet. The lower section manages : fleet target selection, mission type selection, fleet speed adjustment, adding navigators.
Below is a detailed description of the fleets screen subsections:
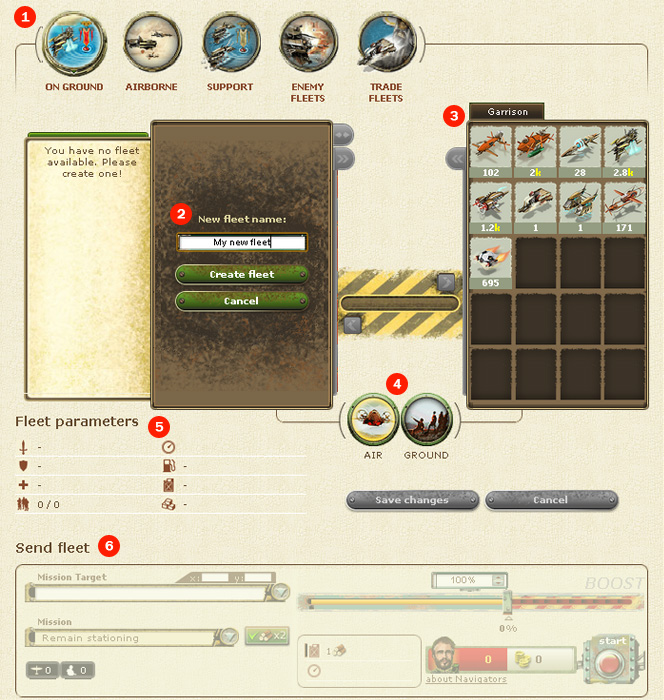
1. The First tab in the fleets section is the fleets management screen. Other buttons lead to other sections, where moving fleets are being displayed. Those sections are not covered here.
2. Fleets list (empty) and the fleet creation panel (in the picture the panel is in the create new fleet mode). It’s where you name your new fleet.
3. Garrson panel. Garrison is a default fleet - the place where all freshly created units belong. The garrison fleet cannot be sent. You can treat it as simple container for units. If a unit is on a given island and it does not belong to any created fleet, nor is it in the bunker, then it belongs to the garrison. It’s the garrison that we use to get units for new fleets.
4. Units type switch. These two buttons are used to switch panel view, so that they show specific unit types (land or air). NOTE : There’s always exactly one type of units shown in the panels (land or air, never both). The navigators and heroes are displayed in the land units section.
5. Fleet parameters section. The parameters of the currently selected fleet are displayed in this panel. The parameters are calculated as you add and remove units, so you can use this section to check how strong will your fleet be before you save it. NOTE : The parameters are always associated with the left panel fleet.
6. Sending the fleet section. This section is used to send fleets on missions for example attack. You will find the detailed description of this section below. NOTE : you can only send a fleet that has been saved and is not being modyfied. Otherwise this panel will remain inactive.

7. The fleets list. In the picture we can see that the last fleet is currently selected. The units of the selected fleet are displayed in the left panel.
8. The panel for moving units. You can move all the units of a given type from fleet to fleet, by clicking on the arrow on the brown background. For moving units individually use the arrows in edit fields or the slider.
8a. You can move all units of a given type(air, land) between the fleets, by clicking the red arrows.
8b. The fleet division button. Right now the button is inactive. Once it’s active and clicked, the panels will go into the fleet division mode. Once in this mode, you will be asked to give name to the new fleet you want to create from an existing one. The panels will work as normally with one difference - the fleet in the right panel will be a new fleet not a garrison.
9. You can select units from panels by clicking on them. Once a unit is selected, you can move it to other fleet by using tools described in the point 8. In case of Flying Fortress, you can see it’s modules once you hover over it.
Below we will deal in details with the fleet sending section. The fleet that is being sent is the fleet from the left panel of the upper section. NOTE : On order to send a fleet it has to be saved first. Otherwise the panel will remain inactive.
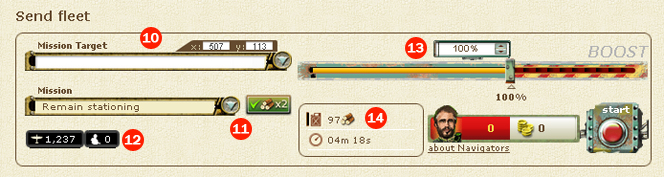
10. The target selection section. There are two steps involved once choosing a target. Step one : choosing the targeted players login. After you have selected a player, you will see his islands and mineral deposits. Only a location (an island or a mineral deposit) can be a target for your fleet. Step two : you will have to choose a location from the list or enter the coordinates manually. The rest of the panel will be activated once you choose the target.
11. The mission selection section. Here you will choose a mission for your fleet. Some missions will be unavailable at times. When a mission is not available it may be beacuse of many different reasons. If you want to know why a mission is unavailable, make sure you have tooltips option on, then hover over unavailable mission. Now you should see the reason why you can’t send a fleet. NOTE : The fleets target selection (described in point 10) can affect the missions availability. So, it may happen that once you have changed the target, the mission will be changed to. There’s a wood icon near the mission selection tool. If this icon is active, the fleet will take fuel both ways. If the icon is inactive the fleet will only take the fuel for one way ride. NOTE : This icon is active by default, it can be deactivated only for certain mission types (for some missions you must take fuel both ways).
12. The units controls. You can see the sum of the land and air units displayed here. Sometimes an exclamation mark may show next to the land units icon. This is a warning, that you haven’t loaded any land units to the fleet (which might be a bad idea for certain mission types).
13. The flight speed section. You can adjust your selected fleets speed in this section. Your fleets maximum speed is the percent under the slider. In the edit field above the slider you can see the percent of your maximum speed. This value can exceed 100% if you take some additional navigators. Go on and move the slider around to see how it affects your flight time (you can see the flight time in the panel described in point 14).
14. Flight information panel. This panel is for display purposes only. Here you can observe how long will it take the fleet to reach it’s target, how much fuel (wood) will it use and how much the tank will be filled with it. The time that is displayed here shows how long will it take to reach the target (it does not include the return).